


.jpg)
What is slackline?
Slackline (or slack line) means "soft strap" or "loose line", the principle is simple: a flat and elastic strap is installed between two trees, the goal being to cross it by walking on it in balance.
Slackline appeared in the 1980s in the United States. At that time, climbers would stretch straps between trees and boulders to keep themselves occupied and rest their arms during rest days or bad weather. This allowed them, among other things, to recover from their climbing sessions and improve their balance, concentration, and core strength.
The practice gradually developed in the climbing world, but it was in 2010 that slackline took off in the media and became a full-fledged sport. Even today, slackline continues to evolve, and we find several derivatives: The jumpline/trickline, with its acrobatic figures; The longline, which can reach several hundred meters in length; The highline, for those who love high-flying; the waterline, for aquatic balance enthusiasts who enjoy diving in.
Why do slackline?
The very essence of this sport is the search for balance, maintaining your body on a more or less stable surface. This exercise is difficult at first, due to the management of our center of gravity. This allows us to stand on any surface if positioned correctly. In slackline, our brain learns to manage the information it receives about the oscillation of a strap barely 2.5cm wide and instinctively readjusts the position of the entire body to succeed in maintaining balance... Too easy, you might say!
This helps develop balance, of course, through the mobilization of several senses like sight and touch at the feet, as well as several organs like the inner ear, which is the center for processing balance. We then talk about Proprioception, which is the set of nerve information transmitted to the brain allowing the regulation of posture and body movements, a kind of "sixth sense" in short.
A true source of well-being:
It's time to clear your mind, completely disregard your environment to focus solely on the state of flow, (or intense concentration). Eminem certifies this state induces an intense feeling of well-being and leaves you in absolute control of your body. It trains the brain to concentrate in general and to select tasks to perform while ignoring external distractions.
Just like yoga, breathing is fundamental to ensure our balance on the slackline. Deep and regular breathing effectively supplies oxygen to the muscles and brain, allowing them to function at 100% of their capacities without tensing or shaking. Moreover, the benefits of breathing work related to slackline practice will also be visible in your daily life.
Slackline is a sharing sport that is practiced in groups, among friends, indoors as well as outdoors. It encourages us to surpass ourselves and boost our self-confidence to push our limits!
.jpg)
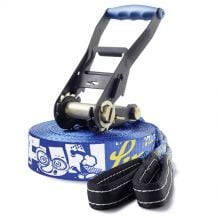
How to choose my slackline?
Slackline can be purchased in a kit, generally including a tree trunk protector, a tension ratchet with a closure for attachment, and the strap.
User profile | Recommended characteristics | Advantages | Slackline kit offered |
With family / with children |
|
|
|
Adult beginner for practice close to home |
|
|
|
Regular practicing adult needing to transport their equipment everywhere |
|
|
|
To start, a 15m long kit will be more than sufficient, you can stretch it over 4/5 meters long, at knee height maximum. Then extend it gradually as your level improves. You can opt for a 25m if you are looking for more challenge or if you envision regular practice.
Be careful! The longer a slackline is, the higher it needs to be stretched to avoid touching the ground in the middle!
Thin or wide?
If you are an adult, go directly for a thin slackline, you won't be disappointed, and neither will your friends!
However, if you are still a child, a wider strap allows for better compensation for the underdevelopment of balance, but also hurts less in case of a fall or allows for more fun on it (lying down, sitting).
DID YOU KNOW?
 | The instability of the slackline will be related to its length, elasticity, and weight:
|
Where to install your slackline?
Generally, you can install your slackline between two trees, but be careful, not just any tree!
The right tree must have at least a 40cm diameter (125cm circumference). Remember to change trees and spots regularly, repetitive use can leave marks. This will only strengthen your slackline knowledge and you will evolve faster! Prefer trees with rougher and thicker bark, more resistant than trees with thin bark (birches).
Thank you for being vigilant to protect our green friends!
Moreover, it is possible to fix a slackline without trees, specific kits are available for sale, on a wall or even directly in the ground. It is also possible to install it between fixed rocks.
Be careful not to fix a slackline on urban infrastructures! The tension exerted by the strap can cause serious damage and put you in danger. It is also advisable not to stretch your slackline across a path or passageway.
If you are looking for good slackline spots, many groups exist on social networks to list them, several websites can also indicate spots via an interactive map. The community spirit of this sport will allow you to meet people and develop your own slackliner network!
How to install a slackline?
You will have understood, using equipment dedicated to slackline is a first guarantee of safety, you don't play around with a DIY setup without knowing the resistance of the different elements. Even if no official standard exists today, specialized companies in this field can provide you with quality products to ensure your safety.
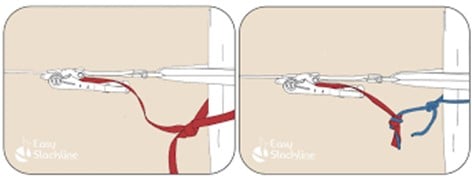
⚠️ Always make a backup to secure your tension system, especially on ratchet or pulley systems. In case of a breakage of an element, there is a risk of projection and injury. The backup helps avoid this situation.
Several backup techniques exist, there is always a way to find a means of making a backup with what you have on hand (extra strap or piece of rope attached to the strap).
If you are a beginner, the length of the slackline will affect the difficulty: the shorter it is, the more stable it will be, it's up to you to gauge and extend it as you progress! Remember to fix the slackline at knee height, if you are in a group, the smallest will set the reference height.
Let's install this slackline, there are two slings: a small one and a large one, we start with the small one, wrap it around your tree WITHOUT TWISTING, at the risk of damaging your strap (Remember to position your tree trunk protector or a piece of cardboard if necessary). On this small sling, we have a ratchet and a loop, pass the ratchet through the loop, and orient the handle downwards. Remember to keep your strap flat while passing it through the loop, you can slightly pinch your sling inward for better positioning.
Then repeat the same process with the long sling (wrap it around the trunk and pass it through the loop) always keeping the strap flat. Then unroll to connect the two ends.
For the last step, pass the strap through the ratchet while keeping the handle down, then tension the strap with one hand and tighten the ratchet with the other. Generally, 3 clicks are enough to tension it correctly. Once the slackline is well in place, remember to lock the ratchet and place a backup. All that's left is for you to go for it!
To dismantle your slackline, unlock the ratchet by opening the jaw to the stop and pressing the handle. Remember to store your slackline properly at the end of your sessions!

How to progress in slackline: some tips
The best way to master your slackline: is to train again and again with the right postures.
Place your strong foot on the strap, keep your arms parallel to the ground, back straight, take a deep breath and push with your second foot behind the first. It is essential to fix a distant point ahead.
Then put all your weight on the front foot to tilt your second leg forward for your first step, always looking ahead. The toes touch the strap first, then the heel, and finally shift your weight onto your leg. Remember to breathe! This will help prevent shaking and increase your concentration. Now it's your turn!